Houdini – TOP Wedge
There is 2 different ways to use Wedge in TOP context.
The push Method is similar to the used with the ROP Wedge. You will set the values in the Wedge Node directly.
With The pull Method you will create attributes (@attribute_example) that you can used later to change the values of your setup. The values will be driven by PDG.
Pull references are very convenient and flexible. However, it does require using TOPs-specific expressions, and it may not be appropriate if you want to use your setup/shaders without TOPs.
Push Method
With this method you will pick-up directly the name of the parameter you want to change in the TOP Wedge Node.
- Check the box next to Target Parameter
- Go and search for the parameter you want to change (you have access to almost anything)
The Attribute Name will be filled-in automatically. It must have the same name than your parameter. You can’t change it or you will have an error. - Change you range and/or change the wedge type (you can have a range like in the ROP Wedge, but you can also choose a specific value, or set a list of values also attribute type)
- Choose how much values you want in Wedge Count

In our case this will generate a wedgeattrib named s_noisefreq1 to get access to the value, you just have to put a @ in front of its name.
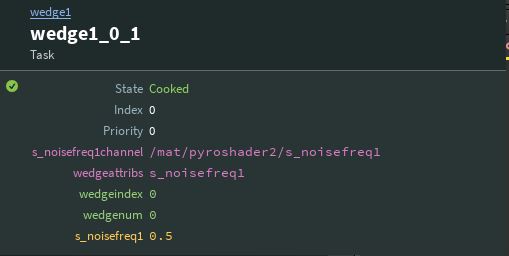
We can use this value to write geometry files or our rendered images.
To do so, you will need to add ` before and after the name: `@s_noisefreq1`
For me, it has more sense than the `@wedgeindex` that we can find in the documentation.

Pull Method
With this method you will define in the TOP Wedge Node, an attribute with a name and values.
Then you will go into your setup and replace the value of the parameter with the name of your @attribute.
- Set an Attribute Name that you will use in your setup later
- Change you range and/or change the wedge type (you can have a range like in the ROP Wedge, but you can also choose a specific value, or set a list of values also attribute type)
- Choose how much values you want in Wedge Count

- Go back to your setup / shader, go to your parameter and enter the name of your attribute with @ in front (here
@freqPDG)

We can also use this value to write geometry files or our rendered images.
To do so, you will need to add ` before and after the name: `@freqPDG` to have the value and you can some text before to help the reading.
Example: enter freq_`@freqPDG`to have the context and value in the filename

How to proceed for a rendering
- After adding your wedge(s)
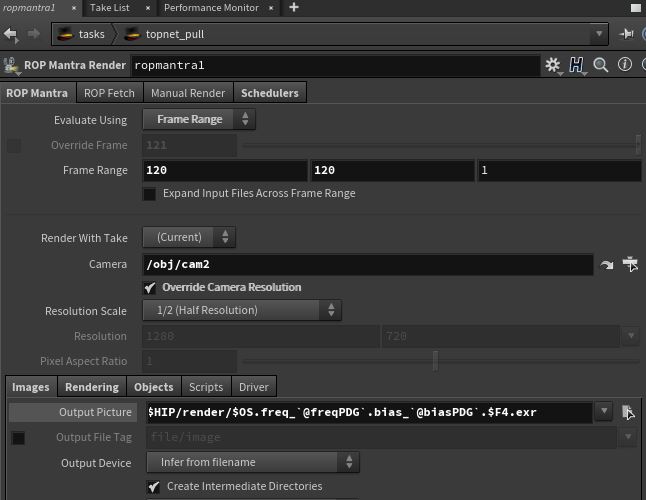
- Add a node ropmantra
- Define your rendering parameters like a normal Mantra Node
- Change from single frame to frame range
The single frame doesn’t take into account the current frame - Change the Output picture to read your wedge parameters like:
$HIP/render/$OS.freq_`@freqPDG`.bias_`@biasPDG`.$F4.exr - Press SHIFT+V to cook your mantra node
How to proceed for a geometry
- Go back to your setup
- At the end of your setup where you would have put a filecache drop a Null and rename it OUT
- Go back to your Topnet
- Add a node ropgeometry after you Wedge(s)
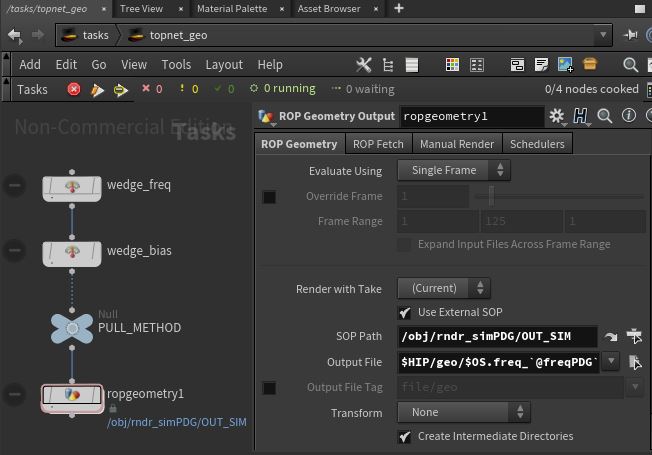
- Copy the parameter Output File
- Go back to your setup
- Add a filecache disconnected from the OUT we put earlier
- Paste the relative reference inside the field Geometry File
- Select the filecache
- Go back to TOP context
- Press SHIFT+V to cook your geometry node
Resources
- PDG For Design Work Pt. 1 – The Basics:
- PDG For Design Work Pt. 1b – Generating Mosaics Out Of Your Renders:
- SideFx’s documentation: https://www.sidefx.com/docs/houdini/nodes/top/wedge.html
- Other interesting links/videos:
https://realtimevfx.com/t/houdini-top-pdg-pyro-wedging/9141/4
https://www.sidefx.com/forum/topic/68258/?page=1#post-290145
https://vimeo.com/338071378